Introduction
From SmartMedia release 2.7.31 onwards it's possible to perform Call Routing authorization on an external application using RADIUS Auth protocol as interface. Number of possible applications is absolutely numerous and below you can find just a few possibilities
- call admission depending on :calling and :called variables (RADIUS server can return Accept or Reject response)
- prepaid application returing a maximum call timeout depending on available credit (input information would be again :called and :calling and server will return besides the typical Accept/Reject also a custom max timeout argument)
- dynamic routing where RADIUS server, depending on :called and :nap (incoming NAP) parameters, returns a list of ordered NAPs in a custom argument, which will be executed by the Routing Engine
Configuration
Configure RADIUS Client
We will assume that the system is already configured with one "Accounting" type of RADIUS server. Accounting type of server is used for publishing CDRs. For more details please refer to this RADIUS configuration master KB article.
Basic instructions for enabling the RADIUS Client if not configured:
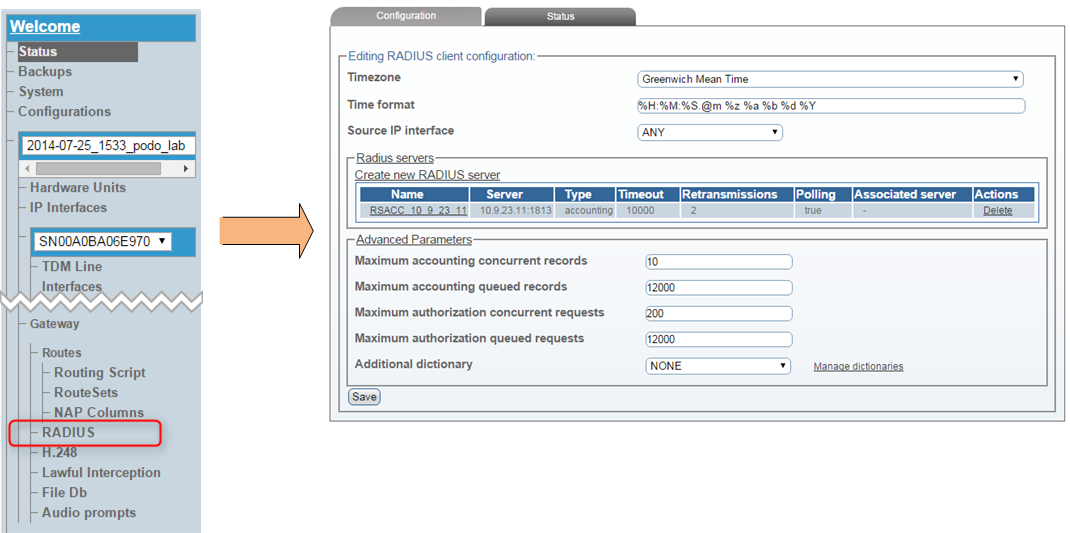
Go to 'Menu -> current config -> Gateway -> RADIUS'
- Timezone - please choose whether to use the local timezone or GMT as timestamp in all RADIUS messages
- Time format - describes how to display the time in human readable format in the CDR records. This is based on the strftime function
- Source IP interface - in case ANY is selected RADIUS messages originate from main MGMT Control Host interface, for SN10100 and SN10200 running 2.8 SmartMedia release IP interfaces configured with H.248/RADIUS role can be chosen alternatively
- Advanced Parameters - specify performance parameters for Acc and Auth methods, which should be modified only in case of requests being queued or dropped
- Custom dictionary - it's possible to use a different RADIUS dictionary, however for the sake of this document we will assume using the standard one (more information about the dictionaries in the RADIUS master KB article)
Apply with 'Save' button when ready
Add RADIUS Auth Server
We will assume the usual configuration objective where RADIUS Auth and Acc server are located on the same host (same server IP and daemon process, different UDP sockets). Such topology is called an "Associated" RADIUS server and is described here.
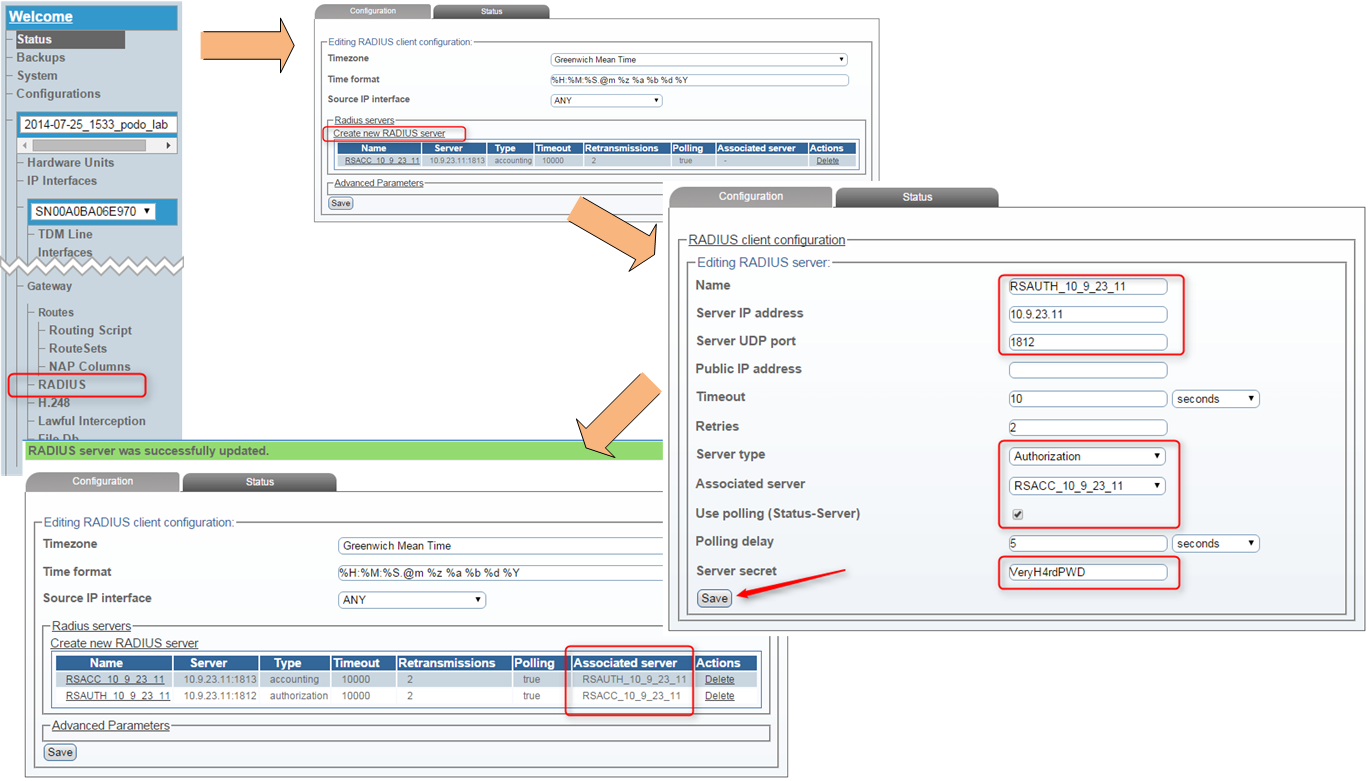
We start in the last place: WebPortal menu 'Menu -> current config -> Gateway -> RADIUS', issue the 'Create new RADIUS server' option. A new page called 'Editing RADIUS server' will appear, where the following options need to be configured:
- name - meaningful name for the RADIUS Auth server
- Server IP Address - RADIUS Auth server IP address
- Server UDP port - RADIUS Auth server UDP port, usualy equals 1812
- Server type - has to be set to "Authorization"
- Associated server - if an Accounting server is configured for the same IP please choose it from the list
- Use polling - allows SN10k to send Status-Server messages verifying if configured server is operational
- Server secret - key required to set up the association with RADIUS server (obviously needs to be equal on Server and SN10k side)
When done confirm with the 'Save' command.
You will return to the 'RADIUS Client' view, where the new configuration should be visible. In case server Association was selected appropriate entries will be present in "Associated server" column.
Check RADIUS Auth Server status
At this point it will be required to activate the current configuration, otherwise checking the RADIUS Auth Server status won't be possible. For configuration activation go to 'Menu -> System' firsty 'Validate' the currently edited configuration and if there are no errors 'Activate' it.
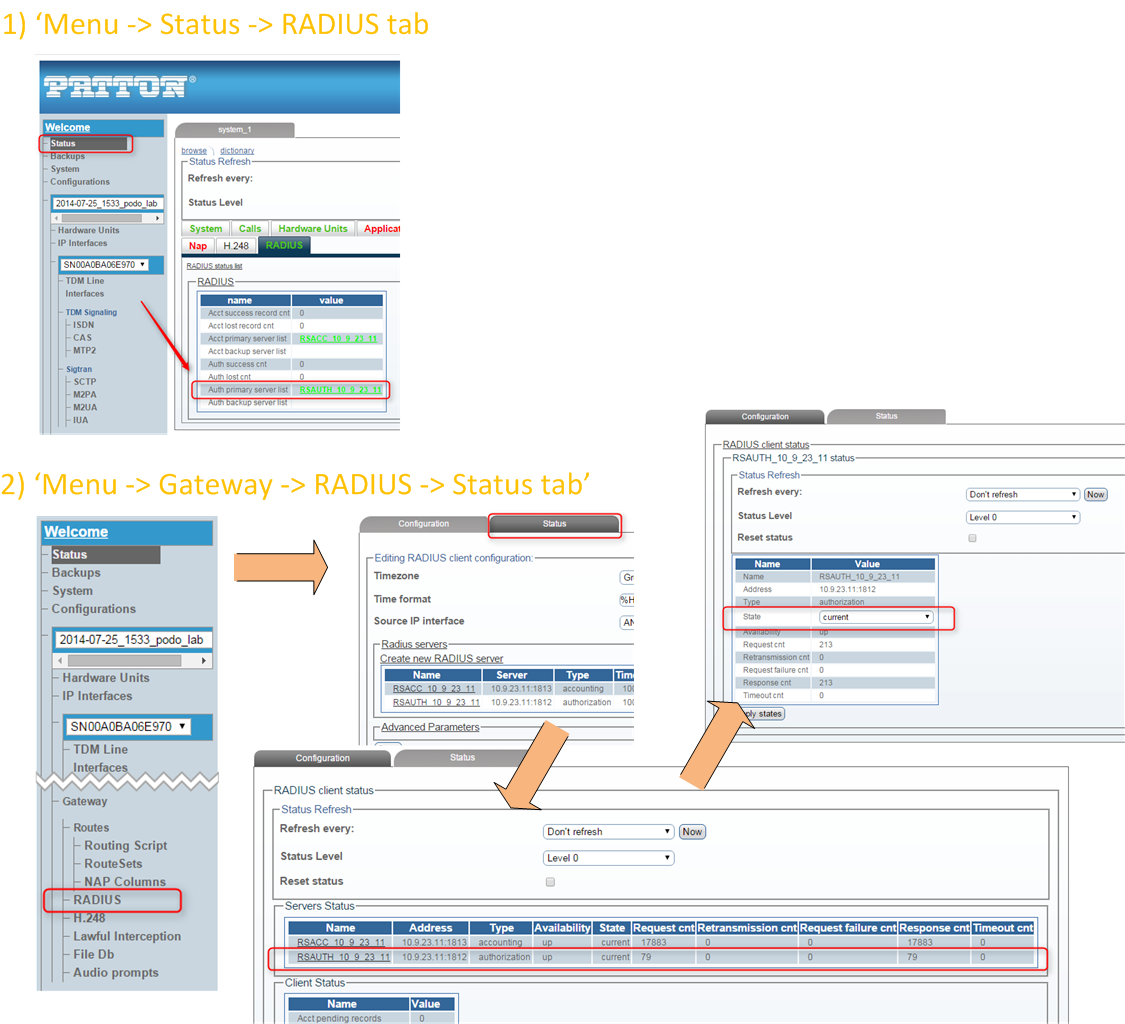
Newly configured RADIUS Server status can be checked using one of two ways:
- 'Menu -> Status -> RADIUS tab' - gives a first impression of the RADIUS Server status, can be either Active or Fault
- 'Menu -> current config -> Gateway -> Status tab' - will present a rather detailed view of RADIUS Servers status, which can be even more verbose when 'Status Level' option is set to '0'
- entering each entry in the above list will display statistics dedicated to a particular RADIUS Server, and moreover will allow to change the Server state to 'active' or 'inactive' (in case a forced failover is required)
Implement RADIUS AAA into Routing Script
Before we can proceed with implementing RADIUS Auth in the Routing Script you need to make sure you are running an up to date script version that contains RADIUS libraries. Go to 'Menu -> current config -> Gateway -> Routes -> Routing Script' and expand 'Filters Scripts' section. Only if 'radius_authorization.rb' script is present you should continue with further steps, otherwise you will need to upgrade the Routng Script version (process will be described in a different KB article). Also be sure that 'Use script' option in 'Menu -> current config -> Gateway' points to your most current Routing Script
Getting back to 'Menu -> current config -> Gateway -> Routes -> Routing Script' please select your main script file (in most cases it will be 'simple_routing.rb'). You can verify if selected file is indeed "the main one" by eveluating if 'Load on startup' checkbox is checked.
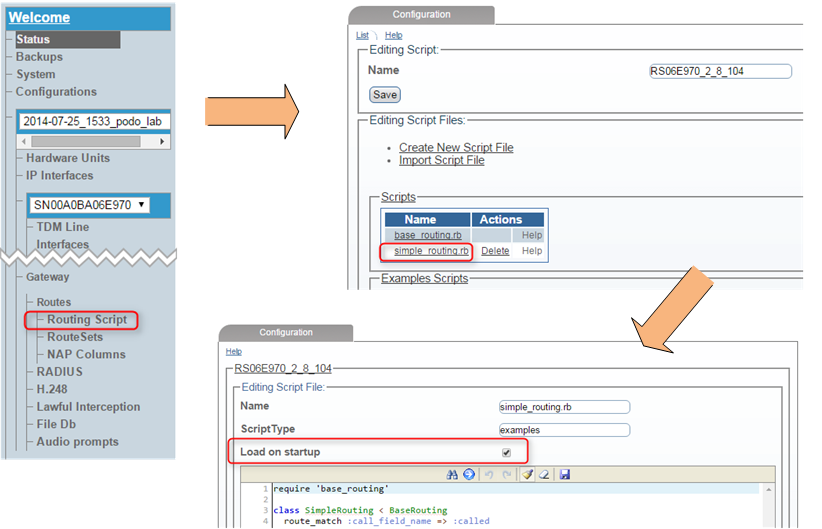
Example contents of 'simple_routing.rb' file we will be working with in this document are as following:
require 'base_routing'

class SimpleRouting < BaseRouting
 route_match :call_field_name => :called
 route_match :call_field_name => :calling
 route_match :call_field_name => :nap
 route_match :method => :match_nap_availability
 route_remap :call_field_name => :called, :route_field_name => :remapped_called
 route_remap :call_field_name => :calling, :route_field_name => :remapped_calling
 route_remap :call_field_name => :nap, :route_field_name => :remapped_nap

 route_order :route_field_name => :prio

end

@@routing = SimpleRouting.new

def init_routes( routes )
 @@routing.init routes
end

def route( call, nap_list )
 @@routing.route call, nap_list
end
Now we will implement the following functionality:
- Following call parameters values will be transmitted using selected RADIUS Attributes (defined in dictionary): call[:nap] => "User-Name", call[:called] => "Called-Station-Id", call[:calling] => "Calling-Station-Id"
- On RADIUS Accept we will generate a log message
- Also on RADIUS Accept system will look for a custom RADIUS Attribute "h323-ivr-in" and log it's value
- On RADIUS Reject we will generate a different log message
Final code should look as following (comments to each customized line can be found inside the 'code block' on the right!):
require 'base_routing'
require 'radius_authorization'                                                   # <- RADIUS Library definition

class SimpleRouting < BaseRouting
  include RadiusAuthorization                                                    # <- include RADIUS method

  before_filter :method => :radius_authorization                                 # <- specify :radius_authorization method as 'before_filter'

  def fill_authorization_attributes(params, auth)                                # <- customize the 'fill_authorization_attributes'
    call = params[:call]                                                         #    function with custom call paramters
    auth[:"User-Name"] = call[:nap]                                              #    presented as specified RADIUS attributes
    auth[:"NAS-Identifier"] = "SN10k"                                            # <-
    auth[:"Calling-Station-Id"] = call[:calling]                                 # <-
    auth[:"Called-Station-Id"] = call[:called]                                   # <-
  end                                                                            # <-

  def on_radius_authorization_accept(params, auth)                               # <- customize the 'on_radius_authorization_accept'
    log_trace :always, "Access-Accept: #{auth.inspect}"                          #    function and log all attributes
                                                                                 # <-
    h323_ivr_in = auth[:"h323-ivr-in"]                                           # <- check for 'H323-ivr-in' attribute and generate
    if h323_ivr_in                                                               #    log entries accordingly to the status
      if ( !h323_ivr_in.nil? && h323_ivr_in != "" )                              # <-
        log_trace :always, "H323-ivr-in attribute available: #{h323_ivr_in}"     # <-
      else                                                                       # <-
        log_trace :always, "H323-ivr-in attribute is empty"                      # <-
      end                                                                        # <-
    else                                                                         # <-
      log_trace :always, "H323-ivr-in attribute not present"                     # <-
    end                                                                          # <-
  end                                                                            # <-

  def on_radius_authorization_reject(params, auth)                               # <- customize the 'on_radius_authorization_reject'
    log_trace :always, "Access-Reject: #{auth.inspect}"                          #    function to log all attributes and
    raise RoutingException, :call_rejected                                       #    reject the call
  end                                                                            # <-

  route_match :call_field_name => :called
  route_match :call_field_name => :calling
  route_match :call_field_name => :nap
  route_match :method => :match_nap_availability
  route_remap :call_field_name => :called, :route_field_name => :remapped_called
  route_remap :call_field_name => :calling, :route_field_name => :remapped_calling
  route_remap :call_field_name => :nap, :route_field_name => :remapped_nap

  route_order :route_field_name => :prio

end

@@routing = SimpleRouting.new

def init_routes( routes )
  @@routing.init routes
end

def route( call, nap_list )
  @@routing.route call, nap_list
end
Replace the whole 'simple_routing.rb' script contents with the above code snippet and confirm with 'Save' button.
Evaluate the Routing Script with the Routing Engine "Test tool"
Before Activating the newly created configuration you may want to verify if the newly deployed scipt is executed as expected. In order to do so, please nevigate to 'Menu -> current config -> Gateway -> Routes -> Routing Script' however this time we will focus on the 'Testing script' section of the page.
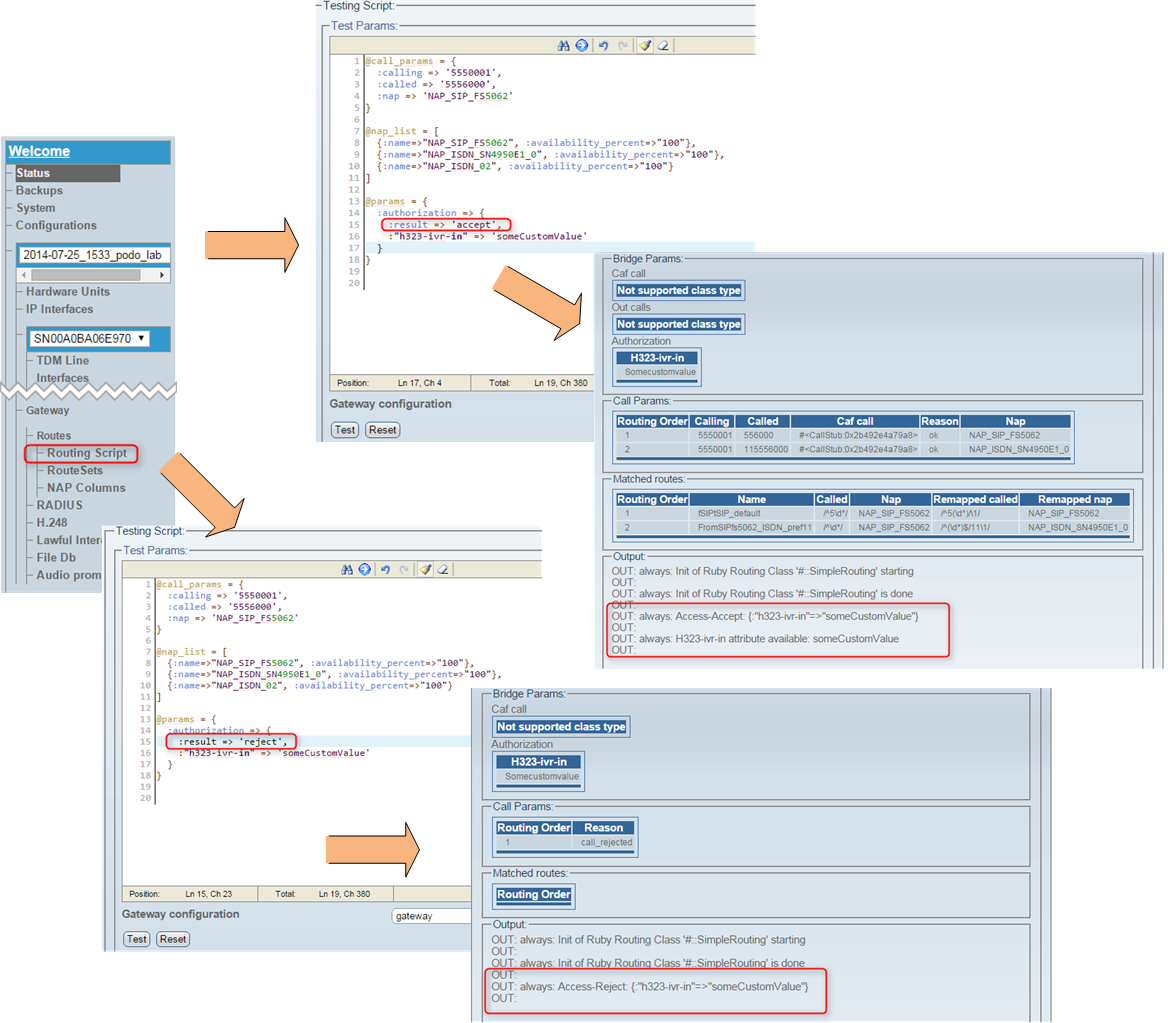
Below you will find the proper contents for 'Test params' section, please modify them accordingly:
- @call_params - :calling (CdPN), :called (CgPN) and :nap (incoming NAP) parameters need be set accordingly with the routing table configured in 'Menu -> current config -> Gateway -> Routes'
- @nap_list - NAP :names should reflect the actual NAP list configured in 'Menu -> current config -> NAPs'
- @params - :result can be set to 'accept' or 'reject' which directly reflects RADIUS Auth server response, :"h323-ivr-in" can be set to some custom value (be cautious about special character though!)
@call_params = {
  :calling => '5550001',
  :called => '5556000',
  :nap => 'NAP_SIP_FS5062'
}

@nap_list = [
  {:name=>"NAP_SIP_FS5062", :availability_percent=>"100"},
  {:name=>"NAP_ISDN_SN4950E1_0", :availability_percent=>"100"},
  {:name=>"NAP_ISDN_02", :availability_percent=>"100"}
]

@params = {
  :authorization => {
  :result => 'accept',
  :"h323-ivr-in" => 'someCustomValue'
  }
}
Commence the test with 'Test' button and observe the bottom page section for results, which can be as following:
Be sure to 'Activate' the configuration if your tests are successfull!
 This answer was helpful
 This answer was not helpful


